Sunday, September 15, 2013

Meyer Lemon Olive Oil Cake


Let's talk olive oil and baked goods.

Until a few months ago, my only encounter with olive oil used in baking was an accident. During college, one of my roommates made cupcakes from a box mix and assuming all oils are created equal, mixed olive oil into the batter. Well needless to say, the rest of us in the apartment had a field day with this little mix up and continued to joke about the olive oil cupcakes for years to come.

Fast forward to my 25th birthday, which I celebrated at Rosemary's - a great Italian spot in Greenwich Village. After an amazing Italian feast, the waitress brought us one final treat for our taste buds. The treat was  none other than their signature olive oil cake....guess the joke is on me!


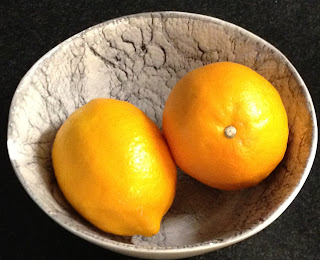
For those who don't know, a Meyer Lemon is a cross between a regular lemon and a mandarin orange. This combination results in a sweeter tasting lemon - perfect for lemon flavor minus the sour kick. Meyer Lemons have become en vogue in the past few years and now can be found in most grocery stores. I recalled seeing a Meyer Lemon version of olive oil cake while paroozing different blogs, so with the itch to make an olive oil cake, I decided this would be the perfect application. I also was about to get in trouble with my roommates if the Meyers my mom so graciously gave me a week ago continued to take up space (and slowly deteriorate) on our kitchen counter. 

This cake is not overly sweet, but the citrusy notes make for a palate pleaser. The use of cake flour and the proportions of egg, oil and yogurt create a light, airy, yet moist texture. I'm officially a believer in olive oil desserts!

Note: Tastes best after it has been removed from the oven and has cooled for about 20-30 minutes. The cake becomes more dense the longer it goes uneaten! 


The recipe:

1 3/4 cups of cake flour* (see substitute below)
2 teaspoons baking powder
Pinch of salt
1 cup granulated sugar
Zest of 2 Meyer lemons
3 eggs
1/4 cup lemon juice (from ~2 lemons)
Scant 1 cup whole-milk plain yogurt
2/3 cup Extra Virgin Olive Oil
¼ cup powdered sugar to sprinkle on top of the cake
Sift together the flour, baking powder and salt and set aside.
Remove from the oven and cool for 20 minutes. Remove from the cake pan and cool completely. Dust with powdered sugar.

*If you do not have cake flour on hand, or do not want to buy any, substitute with all-purpose flour and corn starch. Measure out flour, remove a scant 2 tbsp of flour and return to the container. Measure out a scant 2 tbsp of cornstarch and add to the flour. Sift the new flour mixture 3-5 times so the flour and cornstarch are fully incorporated. 

Preheat the oven to 375°F. Grease a 9 1/2 cake pan with olive oil, then dust it with flour.

Add the zest to the granulated sugar and rub together to infuse the sugar with the zest’s lemon flavor. Add eggs to sugar mixture and beat together for about 2 minutes until the mixture has lightened in color and grown in size. (If you have an electric mixer use whisk attachment for 2 minutes).

Whisk in the lemon juice and yogurt. Slowly pour a stream of olive oil into the mixture and continue to stir until combined. Mix in flour a small amount at a time until the mixture is combined.

Pour the batter into the prepared cake pan and bake for 40-50 minutes.

Tastes best served warm.


Monday, January 21, 2013

Sweet Potato Quinoa Cakes with Blackberry Jam

As time would have it, some of my co-workers are starting to become privy to my blogging (and general food obsession). You can only get so excited about the purchase of a mini-food processor without people starting to wonder....

So when my desk neighbor asked me what was next up on the blog, I decided to take a poll on which recipe should be featured next...without much debate the quinoa cakes won out. Can't say I'm complaining - I think my appreciation for quinoa aka "the superfood" has been evidenced over the past year +.   
Often times, the inspiration behind my recipes is as simple as having ingredients around that I don't want to go to waste. And let me say, it's a good thing sweet potatoes have such a long shelf-life because I put this off for much too long. The flavors of the fresh herbs, caramelized onions and sweet potatoes all come together very nicely into a healthy little cake. The original recipe called for a fresh blackberry salsa accompaniment, but for simplicity sake I decided to use blackberry jam instead - a perfectly acceptable stand-in, but next time I'll go for the salsa!  

The recipe
(From HowSweetEats)


1 medium sweet potato, peeled and chopped
1/2 red onion, diced
1/2 teaspoon salt
1/2 teaspoon pepper
2 garlic cloves, minced
1 tablespoon olive oil
1/2 cup cooked quinoa (be sure to rinse the quinoa before cooking!)
1/4 cup panko bread crumbs
1/4 cup finely grated parmesan cheese
2 tablespoons chopped fresh cilantro
2 tablespoons chopped fresh basil
1 large egg, lightly beaten

Heat a large skillet over medium-low heat and add 1/2 tablespoons olive oil. Add in sweet potato, onion, 1/4 teaspoon of salt and 1/4 teaspoon of pepper, stir, cover and cook for 10-12 minutes, or until potato is soft. Remove lid and add garlic, cooking for 30 seconds.

Transfer potato mixture to a large bowl (slightly mashing potato with a fork) and add quinoa, breadcrumbs, cheese, herbs, remaining salt and pepper and mix well. Once combined, add in egg, then mix until moistened.

Using your hands to bring it together, form equally-sized patties to desired size. Heat the same skillet over medium heat and add olive oil. Add cakes and cook for 3-4 minutes per side, or until golden brown. Serve with blackberry jame (or salsa, below).

Blackberry Salsa
1 pint fresh blackberries, chopped
1/2 red onion, finely diced
1/2 jalapeno, finely diced
1/2 cup chopped cilantro
the juice of 1 lime
salt and pepper to taste

Sunday, January 13, 2013

8 Vegetable Soup

I'm still holding out for the day when my office aka second home (sigh) finally masters the art of temperature control, but until then, I will continue complaining and my scarf will stay on (acquiring a work appropriate snuggie is a work in progress). Given these arctic conditions, I think my co-workers would agree it's perfectly acceptable to crave soup year-round, but particularly to combat the January blues.
Upon moving to New York, I quickly learned about a great soup spot known as Hale & Hearty. Despite abusing my right to "sample" a soup every time I go, I always seem to default back to their delicious and low-calorie 10 vegetable soup as my final selection. It still isn't entirely clear to me which 10 vegetables they claim to have in their soup, but I decided it was time I attempt a version of my own...8 vegetable soup.

The recipe:
Seasonings:
4 cloves minced garlic
2 tsp basil
1/2 tsp red pepper/chili flakes
2 tsp. everyday seasoning (Trader Joe's version combines sea salt, mustard seeds, black peppercorns, coriander, onion, garlic, paprika, and chilli pepper - talk about a spice medley)
1 bay leaf
Olive oil
Salt and pepper to taste

Vegetables:
4 medium carrots, peeled and sliced in rounds
1/2 onion, diced
3 celery stalks, sliced
4 baby potatoes, quartered or in sixths
2 c. leeks (I used pre-sliced frozen, slice if fresh)
1 c. peas
2 handfuls chopped kale
1-14.5 oz. can diced low sodium tomatoes
1-32 oz. container low sodium vegetable broth

Prepare and cut onion, carrot and celery then add to a stock pot with ~1 tbsp. olive oil. Saute for a few minutes until the vegetables begin to soften. Add minced garlic and potatoes. Stir and season with basil, salt, pepper and 1 tsp. everyday seasoning.

Saute for another few minutes then add in tomatoes and the remaining tsp of everyday seasoning. Add broth, bay leaf and red pepper flakes. Simmer for 20 minutes.  Then add frozen peas, leeks and kale. Simmer for an additional 5 minutes.

For added flavor serve with a sprinkle of parmesan cheese on top!

Wednesday, December 26, 2012

Homemade Sushi

There is certainly no shortage of great sushi spots in NYC.  Whether dining at the acclaimed and renowned Nobu (which I do not frequent) or grabbing take-out from the hole-in-the-wall spot down the street from my apartment, I think it's safe to say I would willingly eat sushi at least 5 days a week. 

Flashback to State College, PA, home of my alma mater Penn State, where sushi was not quite as prevalent and the pure logistics of being in the middle of nowhere left me slightly uneasy about consuming anything aside from vegetable rolls! This inspired me to try my hand at making my own sushi and it has been a fun project to take on every now and then ever since. Although it can sometimes be a time consuming process, it is not that difficult of a culinary feat when you keep things simple as I like to. 

On a recent trip home, the sheer sight of ample counter space sparked my culinary inspiration and making sushi for my family was just one of the outcomes of escaping from my shoebox NYC kitchen. 

The recipe:

You will need:
Sushi mat and paddle
Nori
Short grained rice (they sell specific sushi rice in stores, but any short grained rice will work)
Rice vinegar
Sugar
Salt
Sushi fillings (suggested - tuna, salmon, avocado, cucumber, red pepper, green onion, cream cheese)
Sesame seeds, wasabi, pickled ginger (optional)

Preparing the rice
Rice aka kome (vinegared rice) 
- 2 cups kome + 2 cups water --> 3 3/4 cups cooked kome

Measure out the rice and wash in water to remove the excess starch. Drain, rinse and repeat until the water comes clear. Once clean, soak the rice for 15-20 minutes and then drain a final time.

Add to a saucepan with water (1 cup of water for each cup of rice). Cover and heat on medium until boiling, then simmer until water is almost all absorbed - about 15 minutes, stirring occasionally with scraping paddle (shamoji). Remove from heat and let it sit for 10 minutes, then transfer to a separate dish (if necessary, dip paddle in rice vinegar solution, below, and use to help release rice from saucepan).

Sushi Su - rice seasoning 
Combine 1/3 c. rice vinegar, 3 tbsp. sugar and 1 tsp salt in saucepan and cook until sugar is dissolved. Set aside. 

Rice vinegar solution - use this to prevent the rice from sticking to fingers and paddle. Do not mix into rice. 
Combine 1/2 c. vinegar and 1 1/2 c. water

Mix the Sushi Su/rice seasoning into the rice (to taste). Fan to cool the rice - you will need to bring it to room temperature before rolling the sushi. Remember to dip the paddle and fingers in the rice vinegar solution as you go to remove the stickiness.  

Rolling the sushi
Slice all ingredients to desired size. If using sushi grade fish you will want to slice the pieces of fish against the grain.

Cover your rolling mat in plastic wrap. Lay piece of Nori, rough side up, on the mat. Using the paddle, scoop rice onto the Nori and spread around to make a thin layer. If rolling rice on the inside, leave ~1/2 inch at the top with no rice; if rolling rice on the outside, cover the Nori entirely with rice then flip over.

Sprinkle with sesame seeds and then layer toppings about 1/2 inch from the end as desired. Start rolling the nori over the ingredients, ensuring that they stay in place. Continue to roll and release mat, squeezing into the shape of a roll or log. 

Allow the roll to set for a few minutes. Using a sharp knife, slice sushi into pieces. Clean knife with rice vinegar solution to make slicing easier. 

Enjoy sushi with wasabi and soy sauce. 

Wednesday, December 12, 2012

Baked Burrata


I'm all for balanced meals, but cheese for dinner is totally warranted when that cheese happens to be burrata...wrapped in phyllo dough...with roasted tomatoes. Swoon.

A quick ingredient lesson: Burrata means buttered in Italian. Buttery cheese - think about THAT one for a second. Although it's technically not the same as mozzarella, the easiest way to describe Burrata is essentially as a ball of mozzarella with a creamy-velvety-cheesy interior. I'm still trying to figure out exactly how this twist on Baked Brie made it's way into Cooking Light magazine, but I am pretty thrilled that it did.

As is probably evident from my posts, most of my cooking is for my own benefit with the occasional dinner guest(s) to partake in the end product, so you can imagine my excitement when I had a good friend to conjure up a new creation with. Yet in all the excitement, following some of the directions went a bit out the window. Case in point: the phyllo dough. Dough might be a bit of a generous term for these paper thin sheets. Nonetheless, we improvised on the de-frosting process and never turned back - we couldn't risk having to wait any longer to dig into our Saturday night treat, ahem, I mean dinner.

Because I'm a seasoning junkie, I would recommend a few tweaks to the original recipe, but on the whole, I applaud you Cooking Light for highlighting this fabulous ingredient that somehow manages to fly under the radar.

The recipe
(Adapted from Cooking Light)
Notes on prep work: you will need to freeze the burrata ahead of time and defrost the phyllo dough ahead of time


1 (8-ounce) ball burrata or 2 - 4 oz (my preference)
Olive oil
1 teaspoon chopped fresh thyme, divided
1/2 teaspoon kosher salt, divided
1/2 teaspoon chopped fresh rosemary, divided
1/2 teaspoon freshly ground black pepper, divided
4 large garlic cloves, chopped and divided
3 large ripe plum tomatoes, halved
6 (14 x 9—inch) sheets frozen phyllo dough, thawed
Cooking spray

Unwrap burrata; gently pat dry. Wrap burrata in several layers of plastic wrap to preserve the "ball" shape. Freeze 8 hours or until completely frozen.

Preheat oven to 425°.

Combine 2 tsp oil and next 5 ingredients, using half of the quantities listed for thyme through garlic; toss to combine. Arrange tomatoes, cut sides up, on a foil-lined baking sheet and pour the mixture over top. Bake at 425° for 35-40 minutes or until blistered and liquid almost evaporates. Cool. Chop tomato mixture.

Reduce oven temperature to 350°.

Working with 1 phyllo sheet at a time (cover remaining phyllo to prevent it from drying), lay 1 sheet on a flat surface, and coat with cooking spray. Stack another phyllo sheet at a slight angle over the first, and coat with cooking spray. Repeat the procedure with remaining phyllo and cooking spray, angling each phyllo sheet slightly over the previous sheet. Note: if you do use the 2 4-oz burrata balls, you can improvise a bit/use your judgement on the phyllo - half sheets might suffice.

Using a slotted spoon, spoon tomato mixture in center of phyllo stack, and discard any liquid. Unwrap burrata, and place frozen burrata on tomato mixture.

Sprinkle remaining half of each of the seasonings directly onto the burrata.

Fold the phyllo edges over to enclose cheese and tomato mixture, pressing to seal. Turn ball over with tomato mixture on top, and place on a foil-lined baking sheet coated with cooking spray. Brush phyllo with remaining 1 tablespoon olive oil. Bake at 350° for 30 minutes. Remove from oven.

Preheat broiler to high. Broil cheese ball 2 minutes or until golden brown. Serve immediately.


Thursday, November 29, 2012

Thyme for Root Vegetable Fries!


It's the season of change. Changing leaves, changing weather, changing wardrobes and changing vegetables. Ok, sure, some might be not as jazzed up about the last one, but the way I see it, it means a whole new line-up of vegetables to experiment with. Among my fall favorites are the members of the root vegetable family, including parsnips, sweet potatoes, beets and carrots. What better way to enjoy these veggies than to channel your inner child and treat yourself to some "fries"... 
Root vegetable "bakes" doesn't have quite the same ring to it, but no need to break out a vat of frying oil for this recipe when you have a perfectly functional oven at your disposal. Feel free to get creative with your seasonings, whether a cajun-inspired blend speaks to your palate or you want to put an italian twist on the flavors, you really can't go wrong. I thought sesame and thyme was an interesting combination and would definitely take it for a test drive again.


The recipe:

2 parsnips
2 carrots
1 large sweet potato
1 beet
1 tbsp sesame seeds
1/4 c. fresh thyme, finely chopped
1/4 c. olive oil
Salt and Pepper to taste

Preheat oven to 375 degrees. Peel and cut the vegetables into uniform matchstick-like shapes. Warning: beets tend to "bleed" a bit so I like to keep them separate from the rest of the vegetables.

In a measuring cup, measure out 1/4c. of olive oil and add in thyme and sesame seeds. Add vegetables (parsnip, carrot, sweet potato) to a bowl and drizzle with the oil mixture. Transfer to parchment-lined baking sheet. Add beets to the bowl and use residual oil to coat beets. Add to baking pan.

Bake for ~40 minutes, turning the vegetables half way through. Add salt and pepper to taste.

Sunday, November 18, 2012

Hot Crab Dip

Luckily for me, Friendsgiving is becoming an annual tradition, so not only do I get to spend quality time with my best friends, but I also get to chow down on Thanksgiving dinner more than once...Jackpot! 

In the presence of great cooks this meant there was no empty space on my plate to start the meal or in my stomach by the end of the night. Although the 40lb turkey got vetoed immediately, the spread of mouth watering side dishes were the real stars of the evening.  

My contributions to the meal started with the appetizer round. Though I can't claim to have been the genius behind the amazing pear, prosciutto and goat cheese app that kicked off the evening, I went with a hot crab dip that is a family favorite at our holiday celebrations. Usually I scoff at the sight of mayo in a recipe, but all bets are off when this delicious appetizer is in front of my face.   

The recipe:
1 lb lump crab meat
1 can artichoke hearts, drained
1 c reduced-fat mayonnaise (start with 3/4 cup and add in the final 1/4 cup as necessary)
1 c shredded parmesan cheese
1/4 c green onion
Pepper to taste

Preheat oven to 400. Make sure there are no shells in the lump crab meat. Chop up the artichoke hearts and combine all the ingredients into a baking dish (I used about a 10x7 sized dish). Bake for about 20 minutes until the dip is heated through and starting to bubble.

Easy as pie! Serve with celery stalks or your favorite crackers.